Handmade for Family & Friends
Wonderful memories – a pocket photo album for Grandpa
What do grandparents love most of all? Right: proudly showing off their grandchildren. To make sure they have enough "material" to show, a pocket photo album is just the thing. It's personal, looks great and fits perfectly in any wallet. That way the collected photos can be taken everywhere.
You'll need:
plain-coloured cardstock
patterned cardstock
a pair of scissors
a pencil
a ruler
four small photos
optional stickers, stamps, glitter pens etc. for decorating
Here's how:
Grab the plain-coloured cardstock and, using a pencil and ruler, draw a rectangle that is 18cm long and 5 cm high. Then divide the rectangle into six boxes that are 3 cm wide and 5 cm high.
Now you need to score the front. Take the scissors and use them to score the dividing lines between the boxes. This will make the rectangle easier to fold later.
Then cut out the rectangle and set it aside. Now it's the patterned cardstock's turn. Draw two boxes on it that are 3 cm wide and 5 cm high and cut them out. They will later become the "book covers" for your photo album.
Now fold the rectangle of plain-coloured cardstock like a concertina and glue a piece of patterned cardstock to the left and right ends.
Now it's the photos' turn. Glue them onto the four empty rectangles of the concertina, let everything dry and your lovely pocket photo album is ready.
Tip: If you like, you can also decorate the "book covers" with stamps, pearl markers or little sayings.
Chocolate surprise – compliment chocolates for Grandma
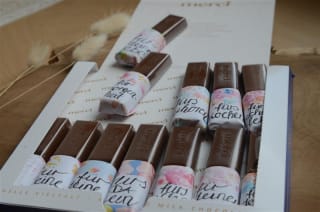
Have you always wanted to tell your grandma everything you love about her? This chocolate gift is the perfect way to do it. It's quick to make, very personal and simply delicious.
You will need:
a pen
coloured card in various colours
some glue
a pack of chocolate bars
How to:
Cut rectangles from the coloured card large enough to wrap the bars.
Before you start wrapping, think of compliments or things you particularly appreciate about the person. Write them in your neatest handwriting on the cut card pieces.
Now wrap. Cover each chocolate bar with the labelled card pieces and glue them closed at the back. Make sure your little messages are clearly visible on the front of the bars.
All done! You can now give the nicely wrapped bars as a gift.
If you feel like more crafting, use the remaining card to make a box to store the labelled bars.
Above the clouds – DIY key ring for Mum & Dad
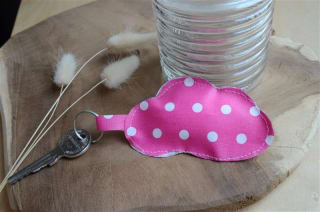
Sewing is fun – especially when you end up with self‑designed gifts for Mum and Dad. The lovely cloud‑shaped key rings are quick to make with a little skill and look really cool on a key ring. Your parents will always carry a little piece of you with them when they're out and about.
You will need:
a few leather scraps
some felt
a key ring
Vliesofix
some stuffing
a spool of thread
a few pins
a hand‑sewing needle
a few clips
a pencil
an iron
a sewing machine
How to:
Iron a piece of Vliesofix (approx. 9 x 15 cm) onto the wrong side of the leather and peel off the paper. Now press the felt piece on top.
Now draw the shape of a cloud onto the felt side with the pencil and cut it out. The cloud will be most even if you print a template beforehand.
Next, iron Vliesofix onto the felt side of the prepared leather‑felt piece again and cut a strip of about 1.3 cm.
Then iron the strip onto the leather again and topstitch close to the edge on both sides with the sewing machine.
Carefully trim the excess seam allowance with the scissors and form it into a loop.
For the back of the cloud use the remaining leather‑felt. Clip it in place, add some stuffing, insert the loop and topstitch narrowly all the way around.
Finally, carefully trim the seam allowance all around and attach the key ring. Done!
Tip: Of course it doesn't have to be a cloud. Any other shape will do, for example a heart, a flower or a star.
Time to Lather Up – Colourful DIY Soap for Your Siblings
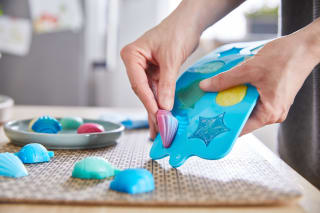
Handwashing is the order of the day. And not just once a day, but preferably more often. Homemade soap is therefore the perfect gift. It looks cool, smells wonderful and is easy to make. Turn your home into a proper soap‑making workshop.
You'll need:
clear soap base
soap colouring
a silicone soap mould
a container for melting the soap (e.g. a bowl)
a knife
a small chopping board
How to make it:
Cut the clear soap base into small pieces on the chopping board with a knife. Then put them into the container and slowly melt them in a bain‑marie (water bath) or in the microwave.
Now it gets colourful. Choose your favourite colour and add a little of it to the soap mixture. Stir well until the colour is evenly distributed.
Then choose the silicone mould and carefully pour the hot, liquid soap into it. Afterwards, leave the soaps to cool — preferably overnight.
Carefully remove the finished soaps from the moulds the next day. Your homemade soap is ready!
Tipp: To make your soap smell as good as it looks, simply mix in a little fragrance oil and some dried flowers.
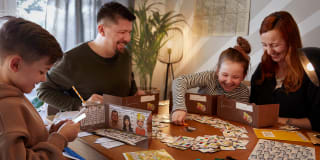
A truly personal surprise – DIY explosion box for best friends

Your friends will be amazed. With a handmade explosion box you'll certainly cause some 'oohs' and 'aahs'. Each box becomes as individual as the maker and is perfect for presenting small gifts in a very special way. But it doesn't have to contain anything — an elaborately decorated box can be a gift on its own. Give it a try!
What you need:
two differently sized square boxes that fit inside each other
sturdy card stock in various colours or patterns
decorative materials such as glitter, fabric scraps, stickers and whatever else you can think of
photos of you and your friends
a large pair of scissors
How to make it:
Take the scissors and cut the larger box at the corners so it unfolds and looks like a plus sign. Very important: do not cut through the base.
Place the unfolded box on the card stock and trace the plus shape. Cut it out and glue it precisely to the inside of the opened box.
Now comes the decorating — the sky's the limit. Stick a nice photo on one of the four inner panels, write a small message on another and cover the next with all kinds of stickers or colourful scraps of card.
If you are happy with your box, take the smaller box, put a small gift inside (e.g. chocolate, lip gloss or your favourite tea), close the box and place it in the centre of the unfolded box.
Fold up all four sides of the large box around the small box and put the lid on. Your very own explosion box is ready!
Tip: Fold a small envelope from some card, write a nice message on a small paper card and slip it inside. You can then attach the envelope to the inside of the box. That gives an extra surprise.
A gift for bookworms – DIY bookmark

The perfect surprise for your friends who always have their noses in books: a homemade bookmark. It’s really handy and can be customised to be especially individual.
What you’ll need:
coloured card
a ruler
a pencil
a laminator with laminating pouches
a hole punch
some ribbon
decorative materials such as glitter, stickers, coloured pens, etc.
How to make it:
Use the ruler and pencil to draw a long rectangle on the card, then cut it out with the scissors. Be careful — the strip should not be too narrow so you still have plenty of space to decorate.
Now get creative: write messages on the cut rectangle, stick on stickers, sprinkle on glitter and do whatever else you fancy.
Afterwards you can laminate the rectangle. It’s best to have a parent help you, as the machine can get hot. After laminating, cut away any excess pouch material around the bookmark.
Now take the hole punch and make a hole in the centre of one end. Thread a piece of ribbon through, tie it in a knot and your personal bookmark is ready.
Tip: If you want it to be even more personal, you can stick cut-outs from favourite photos onto the bookmark. Just wait to laminate until the glue has dried.