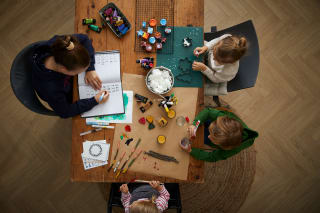
Crafting with children in winter: first inspirations & helpful tips
Blue, white, burgundy and fir green – these are the colors commonly associated with the winter season. But the winter can certainly be much more colorful. When crafting beautiful winter pictures there are no limits; you can create everything exactly as you want – winter is, after all, known for its magic and the magical Christmas season, when things are particularly special.
Crafting and winter motifs couldn't be more diverse. There is a wide selection of symbolic winter motifs as well as nature-inspired winter crafts, which are just waiting to be crafted by you. If you, for example, still have natural materials from autumn crafts left over, they can also be incorporated into your crafting projects for winter. Whether Advent wreaths, Christmas decorations or great winter pictures, which are beautified with natural materials – you will surely find use for twigs, pine cones and chestnuts.
Among the most popular winter motifs for toddlers and also older kids are snowflakes, snowmen, polar bears, penguins and winter trees. These can be crafted in a variety of ways.
For example, you can use paper, felt, fuse beads or cotton wool to make your children's favorite motifs and animals. Of course, in addition to classic crafting materials, empty packaging and fabric scraps from old clothes are also suitable for creative DIYs.
Basically, crafting fun should be your top priority. Nevertheless, make sure that you craft ideas and instructions according to the age, the interests and the skills your children have already developed choose. This is the only way to ensure they are not overwhelmed while crafting. Toddlers in particular have a still undeveloped attention span, so rather simple and short craft ideas are appropriate.
Begin small and gradually build up, until you dare to tackle larger winter craft projects together. Older children, on the other hand, love to demonstrate their craftsmanship. So feel free to choose challenging craft instructions that you can work on together. Maybe you even bring in your own ideas and make the whole thing your very own project, where you can experiment artistically. When crafting with children, everything is allowed.
From kindergarten to school: Why is crafting so important for children?
Crafting in winter is not only a lot of fun for children; they also learn a great deal. Similar to summer-, autumn- and spring crafts your little ones thus learn, in a playful way, what each season has to offer. In winter it's mainly about snow, traditions celebrated in the pre-Christmas season, and animals that feel especially comfortable at this time of year or hibernate.
Besides the facts about winter, there are also motor and social skills, which are promoted in joint crafting sessions. Thus, especially toddlers learn while crafting to concentrate better step by step and to give expression to their imagination. Your little ones love discovering and trying out new things. Accordingly, feeling the materials is something that trains the senses and hones their dexterity.
Last but not least, crafting strengthens and promotes the fine motor skills. Physical development is promoted naturally, which also affects your kids' later self-confidence. Maintaining learning ability and concentration are equally important learning factors. Basically, it shows: crafting fun also means learning fun – so it's doubly worthwhile!
Materials you'll need for winter crafting
Besides a huge amount of crafting fun, you'll of course also need suitable craft materials, so you can start right away. Basically you can craft almost anything that comes to hand: whether classic materials like construction paper, craft cardboard and felt or more unusual packaging and such that are great for DIY projects – you have plenty of choice.
To give you an initial orientation, HABA has put together for you here a list of all possible craft materials and supplies assembled. Maybe you already have some of these at home so you can start right away. We wish you lots of fun!
Basic equipment:
Cardstock
Plain paper
Cardboard, cardboard box
colored construction paper
Transparent paper
Felt
Needle & thread
Craft glue/adhesive or paste
Hot glue gun
Pens & paints
Finger paints
Acrylic & watercolor paints
Bead maker
Brushes
Painting smocks & aprons
Googly eyes
Stickers
Craft scissors
Clay & modeling compound
Beads
Natural materials:
Moss
Pine cones
Acorns
Chestnuts
Nut shells
Wood & branches
Flowers (depending on the season) & leaves
Stones
Upcycling: Don't throw away:
Paper plates/cardboard tubes
Egg cartons
Kitchen & toilet paper rolls
Bottle caps & champagne or wine corks
Mason jars/screw-top jars
Bubble wrap
Empty yogurt cups
Craft ideas for children in winter: simple instructions to recreate
Now you'd probably like to get started right away and beautiful winter crafts to make. Not sure what you'd like to craft first? Then pick one of the following craft tutorials out. HABA has the most exciting craft ideas collected for you and sorted by age group – so there's something for everyone.
Crafting with toddlers in winter
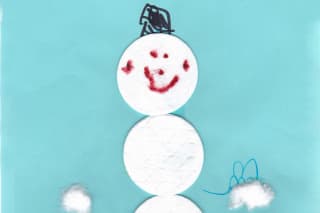
Snowman made from cotton pads
Materials needed:
Cotton pads & loose cotton
colored construction paper
pens & paints
optional: buttons
optional: hole punch
optional: needle & thread
How to:
First, take three or four cotton pads and place them vertically in the middle of your construction paper (in blue or any other color you like).
Now glue the individual cotton pads so that they overlap slightly. The pads form the body of your snowman.
Now for the details: first the buttons. You can draw one or more buttons centered and one under the other on your snowman's body, or you can use real buttons. You can glue these on or sew them onto the body in the middle with needle and thread.
Then draw eyes on the top cotton pad of the snowman. For more fun, punch them out of black construction paper and glue them onto the face.
Next, draw a mouth and nose on your snowman. You can paint the nose and mouth as dots and lines, or draw a carrot for the nose and a line for the mouth. To make it more special, make a small carrot from orange construction paper. First draw it, then cut it out to glue onto the snowman's face.
A snowman also needs a hat. Either draw the headwear with pencils or trace it onto black construction paper (you can also choose other colors). If you choose the latter, cut out the hat and glue it to the top edge of the first cotton pad.
Finally, decorate the rest of the sheet with winter motifs. Whether snow and snowflakes made of cotton, stars, or small pine branches – your creativity has no limits.
And your handmade snowman is finished.
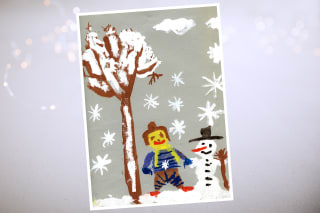
Painting a winter picture: winter landscape
Materials needed:
colored A4 construction paper
pencil
acrylic or watercolors
finger paints
brushes
painting smocks & aprons
painting mat or old newspaper
cotton swabs
craft glue
optional: cotton & glitter
How to:
First cover your work surface with old newspaper or another painting mat. This ensures that no piece of furniture accidentally gets colorful paint spots.
Now take your A4 sheet in the color of your choice. Whether beige, blue, or even white – any color you like is fine. You have two options: you can sketch your tree and the additional winter motifs like a snowman and snowflakes, or you can just start painting without much planning.
Once you've decided on an approach, it's time to get to the paint! Use brown paint to paint the trunk and branches of your tree or to fill in your sketch.
Next comes the snow that gathers on the branches and the snowflakes swirling in the air. You can use cotton swabs as a tool for this. Dip one end in white paint and dab small and larger snow dots onto your winter picture. Of course, your children can also use finger paints. Again: dab white paint in places on the sheet or create larger snowflakes by first painting a white cross and then adding diagonal strokes over it. Tip: For a great 3D effect, take small pieces of cotton and glue them onto individual snowflakes. This makes the whole thing look more realistic.
Now move on to other winter motifs. With white paint you can, for example, paint the three-part body of a snowman. Little black buttons in the middle, a hat, eyes, and a carrot for the nose are of course not to be missed. Your children can also paint more details and even depict a person (maybe even Santa Claus) in their winter picture.
When you're done, let the winter picture dry well and then you can easily hang your artwork on the wall or another place.
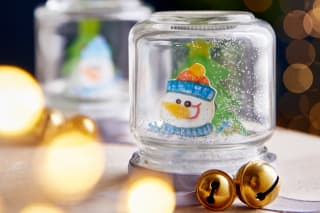
Make a snow globe
Materials needed:
empty, clean jar with screw lid
a piece of styrofoam or a cork
artificial snow or glitter
cotton
hot glue gun & superglue
distilled water
glycerin or a drop of dish soap
optional: Kinder Surprise figure
blank paper
cardstock
pens & paints
towel
laminator
How to:
First, rinse your little jar thoroughly to make sure all residues and stains are removed. Dry it well and set it aside until needed.
Now focus on the figures and motifs that will be placed in your snow globe. These can be a snowman, a fir tree, or other winter motifs. It's best to sketch the motifs first and have your children color them. There are no limits to creativity. Only pay attention to size so the motifs fit well in your jar and there is enough space in all directions.
Once your kids have colored the figures, cut them out carefully. To prevent the paper from softening in the liquid inside the jar, you should laminate the figures. Note: To give the paper more stability, glue it onto a piece of cardstock. Tip:Besides self-drawn motifs, you can also laminate your favorite photos or even use Kinder Surprise figures. With the latter, you can start filling the screw-top jar right away and skip this and the second step.
Next, fill the screw cap with cotton and glue your laminated figures in place with hot glue or superglue. Let the glue dry well so nothing comes loose when pouring in the liquids. Tip:Depending on how big your figures are, it makes sense to build in a pedestal. Corks work well for this. So check before gluing everything together whether your figures need a pedestal so they are clearly visible in the jar and, if so, how much of the cork is needed.
Next, fill the jar almost to the rim with distilled water. Distilled water stays clear for a longer time because it contains neither limescale nor other disturbing substances.
Then add one or two drops of glycerin to the water. Glycerin reduces the surface tension of the water so the glitter particles and snowflakes fall as slowly as possible after shaking. Alternatively, you can add just one drop of dish soap.
Next comes the glitter and snow fun: add as much snow or glitter to the water as you like. Start with a little and add more gradually. This prevents adding too much at the beginning.
Now screw the lid onto the jar. Because the water may splash when you insert the figure, it's best to place a towel underneath. Or move your workspace to the bathroom over the sink.
Carefully test whether the jar is tight and the snow or glitter falls slowly. If so, you've done everything correctly. If not, you can add a bit more glycerin or dish soap.
If everything is as you envisioned, unscrew the snow globe one last time. Dry the lid and the rim of the jar well. Then apply superglue generously to the rim of the lid. This ensures the jar remains completely sealed.
Seal the snow globe again and you're done.
Crafting with children aged 4 and up
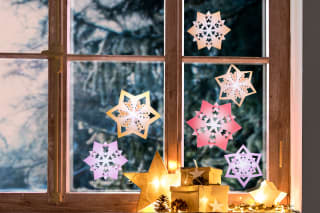
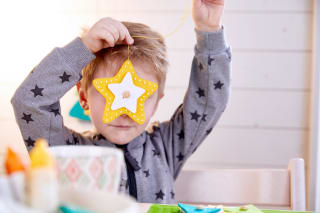
Make window decorations: Sachenmacher folding stars
Materials needed:
transparent tape
How to:
First take the six construction paper cutouts out of the pack. Free the large stars from the outer edges by tearing them out along the pre-cut lines.
Now it's time to fold: take the first star and fold row by row upward. Where you can bring out and fold the points of your star is indicated by the pre-cut lines.
Proceed the same way with each additional star. Tip: If you want to make other star motifs than those described here, get inspired by the instruction manual in the craft kit.
When you're finished folding, tape the stars to your windows with transparent tape. If you offset the stars slightly, a beautiful starry sky appears directly on your window panes.
And your window decoration made of translucent paper is finished.
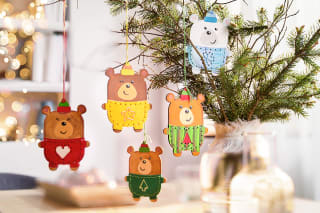
Make Christmas teddy bears
Materials needed:
Sachenmacher embroidered ornament Christmas teddy bears craft kit
plastic needle & thread (included in the set)
colored pencils & markers
acrylic paints
brushes
cords
How to:
The craft kit contains 16 wooden motifs that are just waiting to be painted, embroidered, and dressed by you.
First, start by painting your first teddy. For this you can use colored pencils, felt-tip pens, or acrylic paints. Tip: You can leave out one of the trouser panels, because it will be covered with felt at the end to hide the seams.
Now embroider the motifs painted on the teddy's trousers with a plastic needle and thread.
To elegantly hide the embroidery threads, place one of the felt trousers from the craft kit onto the unpainted side and sew everything together.
Afterwards, you can decorate the felt trousers with bead markers or other embellishments and decorative materials. This gives them an individual look.
And your Christmas teddy bears are finished.
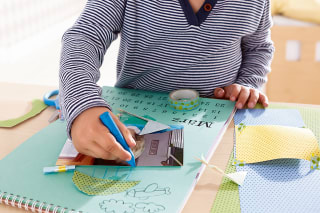
Make a family calendar
Materials needed:
your favorite photos
colored construction paper
felt
craft scissors
craft glue
pens & paints
embellishment & decoration materials (e.g. stickers, bead markers & googly eyes)
How to:
First think about how you want to design your family calendar. In our craft calendar, the months with their days are already printed on the lower half of each calendar sheet. So the upper half is free for you to get creative.
Once you've thought about how you want to design each month in the calendar, you can get started right away. Cut, paint, or glue freely and create beautiful calendar pages worth showing. Maybe glue a photo in each birthday month and decorate the remaining months with special crafts according to the season – basically there are no limits. You have a wealth of choices and complete creative freedom.
Let each crafted calendar page dry well if you're working with acrylic paints or craft glue. Only then move on to the next pages. Step by step, a very special family calendar is created that you definitely won't find for sale anywhere.
When you're done, it's time to hang up your calendar. Find a suitable place in your home where you can look at your artwork again and keep important dates in view.
Crafting with older kids
Make DIY soap

Materials needed:
transparent soap base
soap colorant
silicone soap mold
container for melting the soap (e.g. a bowl)
microwave-safe muffin cup
knife
cutting board
How to:
First make the inner soap piece. To do this, place the transparent soap on a cutting board and cut it into small pieces.
Put the soap pieces into a bowl and slowly melt them in a water bath or in the microwave.
Pour the liquid, hot soap mixture into the silicone mold. It's best to let the soaps cool overnight. Tip: If you want to make colorful soaps, add some soap colorant to the liquid mixture and stir vigorously until the color is well distributed. For a pleasant scent, you can even mix in fragrance oils or dried flowers.
Once the soaps have cooled, remove them from the molds the next day.
Now it's time for the large soap piece in which you place your previously made soap form. Take transparent soap base again and melt it in a bowl.
Put part of the liquid soap into a microwave-safe muffin cup. Let the soap harden there. Set the rest of the soap aside.
Once the soap in your muffin mold has hardened, melt soap again as described above.
Place your first soap form into the muffin cup on top of the hardened base soap and position it as centrally as possible. Then pour liquid soap over it again. You can pop small air bubbles. Let your soap harden well so you can later remove it from the mold.
And your homemade soap is ready to use or to give as a gift.
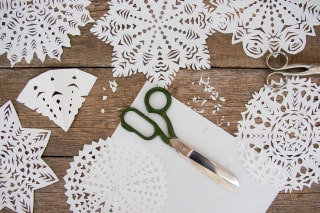
Paper snowflakes
Materials needed:
white, square construction paper (other colors are also allowed)
craft scissors
How to:
Place the square in front of you and fold it into a triangle.
Now fold the triangle in half. Then fold both corners about 2/3 toward the middle.
Cut off the two lower protruding ends with scissors so that you have a triangle again.
Now draw lines, or rather points, on the paper. You can follow the shapes along the lines of the snowflakes in the picture or just draw freely. That way it remains exciting until the end what your snowflake will look like.
Cut out the points along your drawn lines and then carefully unfold the snowflake.
And your handcrafted snowflakes are finished — you can now hang them as window decorations or string them into a garland. Whatever you choose, your flakes will draw everyone's attention.
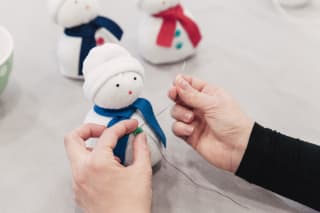
Make a snowman from fabric
Materials needed:
white socks
rice
buttons
fabric scraps (e.g. from older clothes)
cord
buttons in various sizes
hot glue gun
craft scissors
How to:
First cut a sock in two halves. It's best to start just below the heel. Set the front part aside.
Turn the sock cuff inside out and tie it where the heel is only just visible. Make a double knot so everything holds well.
Now turn the sock back right side out.
Next fill the sock to the top with rice. Leave a little space at the top so you can tie the filled sock with a double knot.
Then press the contents in with your hands a little so that the head and body of your snowman become recognizable.
Then take the other half of the sock and roll it at the cut edge one or two times. This creates the hat for your snowman, which you can now put on.
Wrap an old strip of fabric around the snowman's neck and tie it into a scarf.
You can attach the buttons to the belly with a hot glue gun.
For the nose take a button in the color of your choice and glue it to the middle of your snowman's face. Two more buttons make the eyes. Tip: For even better hold, it's recommended to sew the buttons on with needle and thread. That way the buttons won't be lost even after extensive cuddling.
And your sock snowman is ready!
Create Christmas crafts with children in winter
Winter of course also stands for the Christmas season. And what's better than sitting together with the children and making wonderful winter artworks? In joint craft sessions you can get into the Christmas spirit with your children.
Which motifs and craft projects you can tackle are shown by HABA on the corresponding topic pages. From Christmas gifts to exciting and magical decorations, everything is included. Browse the pages and start your winter-Christmas craft fun!
Make Christmas presents

What would Christmas be without presents? At the contemplative celebration, great gifts not only make children's hearts beat faster – parents, the rest of the family, and friends also appreciate thoughtful gifts that come from the heart.
handmade gifts are particularly popular. How you can easily make great Christmas presents with your children is shown by HABA on the corresponding page. You can expect great DIYs, craft instructions and tips.
Make beautiful Christmas decorations
The most beautiful time of the year announces itself, besides the delicious scents of popular treats, also through the beautiful decorations in windows, on doors, and in the streets – the ideas for Christmas decorations are varied.
Whether handmade Christmas stars or individual Christmas tree decorations and special advent wreaths – there are many crafting possibilities that can be easily reproduced. HABA shows you on the page interesting craft ideas, DIYs and instructions.
Design Christmas wish lists

So that Santa Claus and the Christ Child know which gifts to bring your children at Christmas, the Christmas wish list is a fixed part of the preparations for the big celebration in many families.
How your children should best design their wish list and where the important mail should be sent is explained by HABA on the corresponding topic page about the wish list. This makes children's eyes wider and their anticipation of Christmas grows even more.
Make great Christmas cards
Self-made gifts are usually accompanied by kind words. In Christmas cards, your children can artistically express everything they have always wanted to say to you parents, but also to friends and the rest of the family.
Whether colorful Christmas cards with fingerprints or more unusual cards with felt decorations – there are numerous ways to package loving words. The best ideas, craft instructions and DIYs have been compiled by HABA on this topic page.
Frequently asked questions about crafting with children in winter
At what age are children ready for crafting in winter?
What objects can toddlers already make by themselves in winter?
What should be considered when crafting with children in winter?
Read more articles on this topic


Image credits
Snowman made from cotton pads © Calissi - stock.adobe.com
Self-designed winter picture © Gerd Gropp - stock.adobe.com
DIY paper stars © ChristArt - stock.adobe.com
Make a snowman sock © Johannes Ruppel - stock.adobe.com