Crafting with babies? At what age can it really get started
Crafting, messing around with paints, and watching, how their own little fingers make wonderful creations is fascinating for children. So it can never be too early for your babies and toddlers to be introduced into the wonderful crafting world to introduce.
As soon as your little ones can walk and talk and grasp their first things, they also won't hold back from creative activities anymore.
From the age of of one year your children are already able to mess around with paints and try their hand at first paintings.
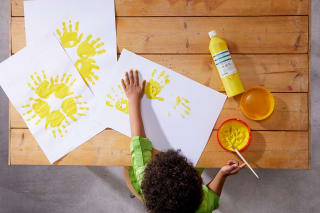
Fascinated, your little crafters watch the traces they leave behind. They especially enjoy colorful handprints or footprints on a large sheet of paper or the back of a roll of wallpaper.
Toddlers from two years old love to try their hand at first scribbles. Once the pencils are firmly in their hands, they're amazed at how these sometimes thin, sometimes thick lines or different colors can create.
They also won't hold back from using craft scissors anymore. It's especially important that you, as parents, offer support and don't take your eyes off them while they cut.
Basically, you should also avoid using sharp craft materials and utensils or leaving them lying around.
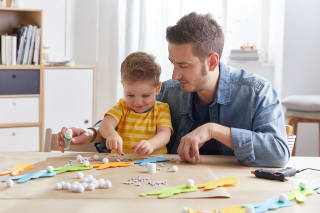
The older your children get, the more interest they have in challenging craft projects. If that's the case, it's best to decide together which craft ideas and DIYs you want to implement.
If your kids sometimes feel less like crafting, that's nothing to worry about.
All children are individual, and so are their interests, which may change in phases
First ideas for crafting with toddlers
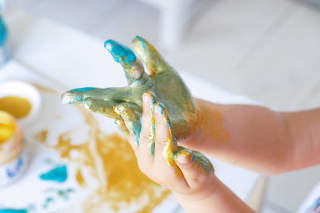
Toddlers love to experiment. They like to try things out, so the choice of motif is secondary at first is. Messing around with finger paints is especially popular.
In the process they create, completely as they please, wild creations, where it doesn't matter what the final result looks like. The focus is on fun and the first discovery of their own abilities such as fine motor skills and creativity.
As your children become a bit more practiced over time in handling craft materials and utensils, craft ideas may become a bit more concrete. Finger, hand or footprint prints are especially popular with little crafters.
These can then, depending on abilities, also be expanded with further details into beautiful pictures.
The choice of motif becomes increasingly important, as your toddlers gradually learn to understand their environment and all external influences and the curiosity is so great that they want to recreate certain things.
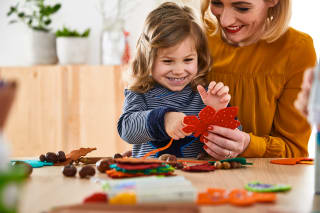
Particularly the crafting for different occasions and seasons is well received by the little ones.
Thus, the following count among them: Summer crafting and spring – including the crafting funny Easter bunnies – among the favorite activities of craft-loving toddlers.
Whether animal motifs from paper or individual figures made from natural materials: the choice of motifs seems limitless.
Generally you should choose craft ideas, DIYs and instructions according to age, interests and especially existing abilities. For toddlers it is important to choose craft projects that do not overwhelm them.
The attention span is not yet fully developed, which is why they find it difficult, especially in the very first crafting sessions, to concentrate for longer than a maximum of fifteen minutes to concentrate.
The older your children get, the more and more decisively they can help decide which ideas they'd like to recreate. The crafting fun thus provided and above all the joy of spending time together strengthen your family togetherness.
This is also reflected in your craft results. When made with lots of love, the most beautiful works of art are created.
What do toddlers learn in shared crafting sessions?
When crafting, toddlers not only learn to handle various materials and craft tools, but above all also to get to know their own abilities intensively so that they can use them purposefully. The particularly promotes fine motor skills and creativity. But also the following craft instructions and rules of conduct teaches children to approach certain situations and tasks in a solution-oriented manner.
Crafting also has many positive effects on child development. During creative activities, toddlers mainly train their perseverance as well as their frustration tolerance. The more practice they have, the longer the enjoyment of crafting lasts and new craft projects are chosen with great motivation.
Also the vocabulary of your little crafters is positively influenced. Thus toddlers increasingly learn various shapes, materials, colors and tools by their specific names.
What you should pay attention to when crafting with toddlers
To make crafting with toddlers a complete success and to keep the crafting fun consistent, here are a few tips you can follow. Even when choosing your craft ideas, you should involve your kids. This way you make sure they like the craft projects.
Also establish rules of conduct, which should be followed by all family members during your crafting activities. That way you can stipulate that no one is allowed to run around the work surface or that task areas are divided between siblings be divided.
During preparation you should get an overview of the various steps of your craft projects gain. Depending on the difficulty level of the tasks, it is advisable that you as parents perhaps already take care of the most difficult steps in preparation so that during the joint crafting you only need to concentrate on the design.
Toddlers thus have the chance, to devote their concentration entirely to the tasks that interest and creatively challenge them.
When it's time to craft, you should already have all craft materials and utensils ready, cover the work surfaces with mats or similar and dress your children in suitable clothes so they can express themselves creatively without concern.
The craft materials should be selected to be child-appropriate or only used under supervision. In general, it is important that you never leave your little hobby artists unsupervised.
Plan enough time, because some steps simply require more explanation than others. In addition, your kids have the chance to develop their own ideas and complete projects.
However, make sure to stop as soon as your children's concentration wanes. Your craft projects won't be lost, even if you only finish them a day later.
Basically you should not interrupt your little crafters when they are in the flow of crafting.If they need parental support, they will usually let you know.
This strengthens the self-confidence and sense of responsibility of your children.
The moment of joy, when you realize together as a family what great things you've created, will in any case be special.
Crafting with toddlers: Materials you'll need
To create beautiful craft ideas, you'll need, in addition to a big dose of joy of course also the right craft materials and tools.
HABA has compiled a list that a good overview provides and that you can use as a guide. Maybe you already have some of these items at home, so you can start your craft sessions right away can.
Blank paper
Cardboard, cardboard box
colored construction paper
translucent paper
felt
needle & thread
craft glue/adhesive or paste
pens & paints
finger paints
acrylic & water-based paints
painting smocks & aprons
brushes
craft scissors
modeling clay & modeling dough
beads
newspaper
wool, balloons, stones
googly eyes
salt dough
natural materials (e.g., chestnuts, pine cones & acorns)
Craft ideas & instructions for toddlers
Now you probably want to start crafting straight away with your little ones. What are you waiting for? Ready, set, go: Grab your craft supplies and find your favorite ideas and tutorials to recreate. You'll have a lot of fun!
Let your creativity run free and take your toddlers into the world of the most wonderful crafts.
Crafting with one-year-olds
Painting with finger paints
Materials needed:
Blank paper in the size of your choice
colored construction paper
finger paints & watercolors
pens
brushes
small bowls for the finger paints
old newspaper
masking tape
painting smocks or old clothes
How to:
First prepare your work surface by covering it with newspaper. This ensures that no paint splatters end up on the countertop or other surfaces.
Now take your blank paper in the desired size and carefully tape its four corners to the newspaper with masking tape. This keeps it from shifting while painting.
From now on your children have the chance to let their creativity run completely free. They can eagerly dip their fingers into the finger paints and conjure the wildest creations onto the paper. Tip: If your little ones would like to create specific motifs such as animals or flowers, you can sketch these on the paper first. Then your kids can paint the areas with finger paints, creating great finger-paint animals and more. Handprints are also very popular with children. These can also be colored with pens.
When your finger-paint artworks are finished, let them dry thoroughly. In the meantime, wash your little fingers with some lukewarm water and change your clothes.
Marble paintings
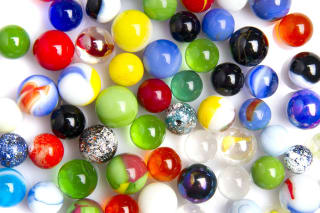
Materials needed:
(glass) marbles in various sizes
lid of a shoebox
Blank paper
finger paints & acrylic paints (in tubes for better dosing)
How to:
First place your sheet of paper in the lid of a shoebox.
Now take the colors of your choice and place slightly larger paint blobs spaced apart on the paper. Paint tubes work best for dosing the blobs. The spots can be small or larger, resulting in a beautiful play of colors in the end.
Then place your marbles of different sizes into the box on the paper and near the paint spots.
In the next step take the shoebox lid with both hands. Gently rock it back and forth so the marbles move through the colors and create paint trails that gradually form a work of art. Tip: Your children can also do this step without parental help. They should just know not to shake the box too vigorously, otherwise the marbles will roll around the room and floors or furniture may unintentionally get a new design.
If you're happy with your color spectacle, let it dry well before you remove the paper from the shoebox lid.
Now just find a suitable place where your colorful artwork can really shine.
Crafting with two-year-olds
Wild snipping
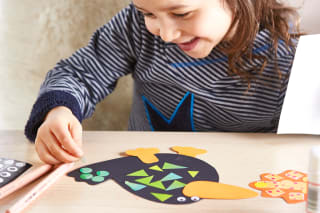
Materials needed:
Blank paper
colored construction paper
craft scissors
craft glue
feathers
decorative & embellishment materials
How to:
Give your children any paper and let them happily tear and rip small paper scraps. Little crafters who have already discovered cutting with craft scissors can of course use them under your supervision.
Then spread some craft glue on a blank sheet. Your children then take their paper scraps and glue them onto the sheet one by one, creating a colorful picture of wild snips. Alternatively, you can draw animal or other motifs on the blank paper before gluing to place the scraps more intentionally.
You can embellish your artwork a bit with feathers and other decorative materials such as beads or glitter, if you like.
And your paper-scrap masterpiece is done.
Potato stamps for prints
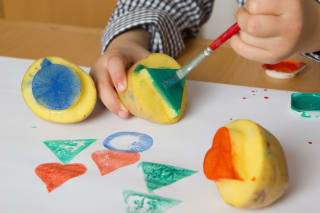
Materials needed:
medium-sized potatoes
small kitchen knife
paper towels
cutting board
paper in the colors of your choice
masking tape
acrylic & water-based paints
finger paints & bowls for filling
old newspaper or other coverings
painting smocks or old clothes
How to:
First prepare your potatoes by shaping and halving them. You can carve your chosen stamp motif with a kitchen knife or press it in with a cookie cutter. If you choose to cut it out, you then just need to cut the stamp neatly with the knife. Tip: Parents should do this part to prevent your little crafters from cutting themselves and so you can start stamping right away.
Press the cut surfaces of your potato stamps dry on paper towels so no moisture remains and they can take the paint well.
Now prepare your work surface by laying out painting underlays or old newspaper. Attach your paper to this so it doesn't shift while stamping.
Your children can take the next step themselves: let them dip the potato stamps into a finger paint of their choice or paint them with acrylic paint.
Press the stamp with the paint firmly onto the paper. Repeat the process until a beautiful artwork of numerous potato prints lies before you.
Just let the prints dry well and then you can hang up or give away your pictures.
Crafting with preschoolers
Brightly colored paper plate artworks
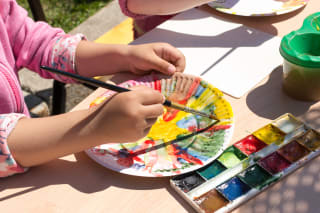
Materials needed:
paper plates
acrylic & water-based paints
finger paints & bowls for filling
brushes
painting smocks & aprons
pens
old newspaper or other coverings
How to:
First prepare your work surface by laying out painting underlays or newspaper.
Then choose the paints you want to use. From finger paints and acrylics to watercolors, various options are available to let your creativity run free.
Now it's time to design the paper plates. Brush them with a paintbrush or your little fingers using a variety of colors. Let your surroundings inspire you or just paint freely as your imagination suggests. For children it's just the right thing to be guided by their feelings.
If you like it more detailed, simply sketch motifs on the paper plate that just need to be colored in. The more colorful, the better.
When you're done with your colorful artwork, let it dry thoroughly. In the meantime, you can think about where you'd like to display it at home.
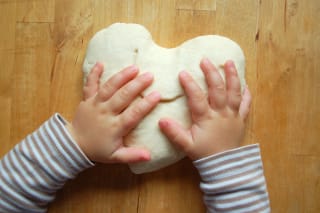
Salt dough with handprints
Materials needed:
acrylic & water-based paints
brushes
felt-tip pens
needle & thread or cord
craft scissors
These ingredients you'll need:
1-2 cups of flour
one cup of salt
one cup of water
1-2 teaspoons of oil
half a cup of cornstarch (prevents the dough from cracking)
How to:
Mix salt, flour and cornstarch together in a bowl. Then add the oil and water. Note: The liquid ingredients are only added at the end so the mixture binds more easily and no unsightly lumps form.
Now you can mix the dough with a dough hook or go ahead and knead it by hand, since the dough can only be shaped by hand in the end anyway. Tip: If you want to make a colorful salt dough, you can add food coloring or spices like curry and paprika while mixing the dough to get great coloring before baking.
Once you've kneaded your dough well, your children can shape it. Whether hearts, stars, small and large circles or even a pretzel — your little crafters can get creative here. Cookie cutters can also be used for various motifs. Tip: If you want to hang your salt dough later, you can make a small hole at the desired spot with a toothpick. After baking and painting, a string can easily be threaded through this.
How long your salt dough should stay in the oven to dry depends on the result you want to achieve. The more golden you want the dough to bake, the longer it should remain on a baking tray and baking paper in the oven. Generally, the salt dough should bake at a low temperature. Accordingly, it should dry at 60 degrees for almost three hours. Tip: With a knife you can test after two hours whether the salt dough can still be pressed in. If so, it needs more time in the oven.
Once your salt dough motifs are finished, let them cool down first. Then it's time to paint the salt dough with your children and make them shine in the most wonderful colors. Again, there are no limits to your creativity here. Dots, stripes, words – everything is possible.
Finally, just thread a string or cord through your salt dough artworks so you can hang them up.
DIY painting board for the kids' room
When children have the opportunity to let off creative steam, they naturally take it. Our Craft O•O hack for little artists is a great alternative to a painting board, pro canvas & co. Your little ones will love it! And you will too, because it is easy to make and the result cleaner than a painting board with constantly flying chalk dust. In addition, lots of great picture gifts for grandparents, godparents, friends, neighbors, and so on.
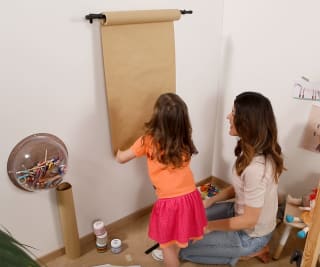
You need:
for the top edge: 1 round curtain rod with wall bracket + mounting hardware
for the bottom: 1 square slat, mounting hardware + washers
drill driver
1 roll of packing paper
pens, wax crayons, paints & co.
How to:
Choose a (preferably smooth) wall surface.
Attach the curtain rod to the wall with the bracket.
Slide the roll of packing paper over the curtain rod, hang it in the bracket and roll it down.
Place the square slat at the desired height over the paper and also attach it to the wall. Don't forget the washers so the paper can be pulled through easily.
The bottom edge of the slat also serves as a tear-off edge for the paper.
Ready to start painting!
Tip: When paints and pens are within reach, you can start getting creative at any time.
Frequently asked questions about crafting with toddlers
First crafting for children | How long may crafting with toddlers last overall
First crafts for children | What to do when toddlers have no interest in crafting
First crafting for children | What alternatives are there to crafting with toddlers
More articles about leisure & creativity

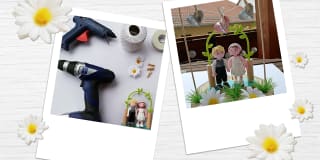


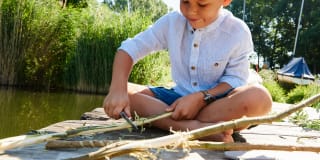
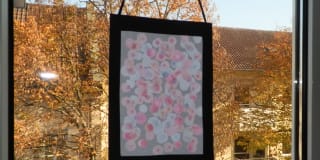

Image credits
Girl painting a paper plate © johndwilliams - stock.adobe.com
Children's hands with dough shaped into a heart © thingamajiggs - stock.adobe.com