What simple ideas can I use for Halloween crafting with children?
Spooky window decorations:
Draw various Halloween motifs on black, white or orange cardstock, for example ghosts, spiders, bats, witch's brooms or a pumpkin. Your child can cut out the motifs, punch a hole and attach them with a thread to a gnarled branch or a ring cut from cardboard — and the Halloween mobile is ready! Alternatively, you can glue the Halloween motifs onto painted paper plates and hang them up.
Ghost garlands:
Garlands are a typical party decoration, but they also look great in the entrance area, for example if you distribute sweets to little Halloween treat collectors. For this you can either print out Halloween motifs, cut them out and glue them onto a ribbon to make a garland, or shape little ghosts. To do this, place a paper ball on circularly cut pieces of tissue paper, pull the paper up around it and tie with a thread. The ball becomes the ghost's head, the excess tissue the body. These ghosts are then strung together on a cord to make a garland.
Halloween masks:
If you take some time to prepare, you can make imaginative Halloween masks from papier-mâché or plaster bandages. Faster and easier are preprinted cardboard masks that your child can cut out, paint and glue together.
Halloween invitation cards:
If your child celebrates Halloween with friends, authentic invitation cards are of course part of it. With a few simple steps you can make great DIY Halloween invitations, for example in bat or pumpkin shapes cut from construction paper and written on. A bit more elaborate is a mini paper lantern with a spooky face on it. Inside you can hide a note with the invitation details. If you like something sweet, bake small pumpkin or skull cookies in advance, decorate them with icing and put each cookie with a small invitation card in a clear plastic bag.
Crazy toilet-roll monsters:
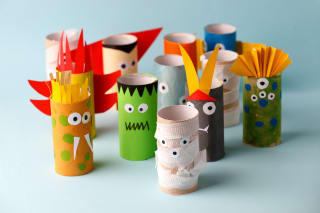
It's worth saving empty toilet paper or kitchen roll tubes — because you can make truly unique monsters and creatures for Halloween from them! There are no limits to your child's imagination. The empty rolls can be covered with colorful paper or painted with colors as desired. Decorate the monsters with felt-tip pens, attach colorful pipe cleaners for a wild hairstyle or glue on lots of googly eyes so the creature can watch everything closely.
Spooky lights:
Candles, tealights or fairy lights create the right atmosphere at Halloween in your home. With a few simple steps you can give the light sources a creepy touch — for example by crafting mummy lights. Old jam jars are wrapped with gauze bandages and given two googly eyes. Now add a tealight to the jar and the lighting is ready.
Or how about colorful ghost lights?
For this you need plastic cups in different colors and waterproof markers in several thicknesses. Place the cups so that the opening lies on the table and the bottom faces up. Now you can draw spooky faces and expressions on the cups as you like. Finally place an electronic tealight under the cup and the ghosts begin to glow.
Craft materials – what you need for Halloween crafting fun
Before the big Halloween crafting session with your child begins, you of course need the appropriate craft materials. Many of these you probably already have at home — after all, children love to craft and be creative. In autumn you can also find great natural materials outside that are suitable for Halloween crafts, such as chestnuts or pine cones.
Once you've decided on a specific craft idea, conveniently gather the necessary materials. General rule: the more craft supplies, the better — the more imaginative and unique your Halloween creations will be! At HABA you'll find plenty of craft supplies and accessories for Halloween crafting with your child.
Here's an overview of the most important crafting materials:
Cardstock in various colors
Scissors
Ruler
Craft glue
Clear tape
Hole punch
Stapler
Pencils, colored pencils, markers and wax crayons
Pencil sharpener
Colored yarn or thread
Paintbrushes
Acrylic and watercolor paints
Stamps and ink pads
Decorative gems, googly eyes, etc.
Essential for Halloween crafting with children: carving a jack-o'-lantern
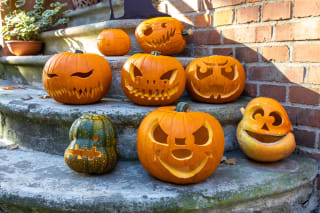
In the days around Halloween you see them everywhere in doorways, on fence posts and on steps: carved jack-o'-lanterns whose creepy faces cast their dim, orange-red light. Pumpkins also work very well as table decorations — and carving pumpkins is a lot of fun. With a few tips and some help from an adult, children can design their very own spooky face.
Tip: Save the pumpkin flesh to turn it into something delicious for the Halloween party. Particularly popular Halloween recipes are pumpkin soup, pumpkin muffins, sweet pumpkin bread or pumpkin cake.
Craft flying ghosts for Halloween

Boo! Creepy ghosts must not be missing in your home at Halloween. They look spookiest when they dangle from the ceiling and appear to float in the air. We'll explain how you can easily craft the ghosts together with your children for Halloween.
You'll need:
White paper cups
White cardstock
White crepe paper
Twine for hanging
Pencil
Black marker, alternatively googly eyes
Clear tape
Glue
Here's how:
First prepare the paper cup so you can hang it later. Carefully pierce a hole in the center of the cup bottom using the scissors or the tip of the pencil.
Cut a length of twine for the hanger. The length depends on where you hang the ghost and how far you want it to dangle. Now thread the string through the hole in the cup bottom. Tie a knot in the end inside the cup so the string can't slip back through the hole.
Take the white cardstock and draw two small arms for the ghost with the pencil. Then carefully cut them out. To attach the arms, cut small slits on two opposite sides of the cup with the scissors. Now push the arms into the cup. If they don't hold by themselves, you can fix them inside the cup with a little clear tape.
For the ghost's spooky garment, cut a two-centimeter-wide strip from the roll of white crepe paper. Unroll this strip and divide it into about six shorter strips.
Attach the resulting strips to the inside rim of the cup with a little glue. If you now turn the cup over, the strips hang down creepily like a garment.
Give the ghost two big eyes with a marker — alternatively you can stick on two funny googly eyes.
Now the ghosts can be hung up. Tie them, for example, to a ceiling lamp or hang them on a nail in the wall. The ghosts look particularly spooky when the crepe paper strips flutter and move in a light draught.
More articles about leisure & creativity
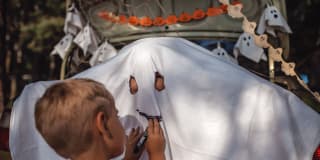

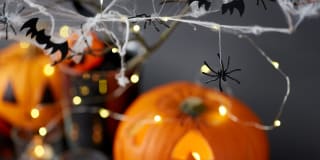
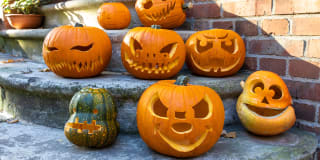
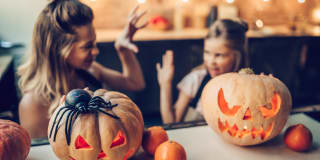
Image credits
Toilet-roll monsters © misskaterina - stock.adobe.com
Pumpkin lanterns on a staircase ©Stefan Werner - stock.adobe.com
Paper cup ghosts ©sorapop - stock.adobe.com