Modeling: a craft activity that promotes cognitive skills
In many educational concepts, the modeling of shapes and figures plays an important role in everyday daycare or school life. By working with various modeling materials such as clay, sand, playdough or papier-mâché, children not only practice their fine motor skills, they also develop their powers of observation and learn to accurately estimate and reproduce proportions. Unlike when painting, objects are represented three-dimensionally when modeling. This is a challenge for children that gets better each time.
Which modeling techniques for which ages?
playdough Colorful playdough without plasticizers can already be used by the very youngest. Harmless for small children and easy to work with as a modeling material, playdough is unfortunately also not durable: after a while little artworks become crumbly and unattractive.
Self-hardening / oven-hardening modeling material Modeling material can be bought at the craft store. It is somewhat firmer than playdough, but can be kneaded soft for processing. Even kindergarten children have a lot of fun with this modeling technique. After hardening in the air or in the oven, the figures can be varnished, decorated or painted, for example as figures on a homemade mobile.
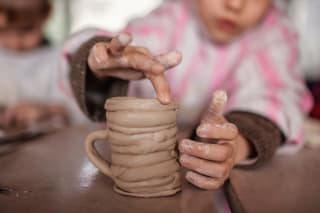
Clay Working with clay is a very good exercise in sensory perception for kindergarten and primary school children. It is easy to work with like playdough, but with some water it can be squished and glued as desired. Those who do not have access to a clay kiln can buy air-drying clay at the craft store, which can be painted with acrylic paint after drying.
papier-mâché Modeling with papier-mâché isn't hard, but it takes time. Both soaking or pasting the paper pulp and drying and decorating the figures take a little while. Primary school children manage very well with papier-mâché with a bit of help and can, for example, make masks, heads for hand puppets, or figures by themselves.
Plaster bandages Modeling with plaster is similar to working with papier-mâché, but you have to be a bit careful when handling plaster and water. However, the work and cleaning effort is worth it. Models made from plaster bandages become very hard and are perfect for reproducing certain shapes.
Craft tip: papier-mâché masks made from balloons
Materials needed:
Balloons
Newspaper
Bristle brush (paintbrush)
Wallpaper paste for mixing
Paints and brushes for painting
Optional yarn for a hairstyle, colorful decorative stones, etc.
Elastic band
Modeling – how to:
Blow up one balloon per mask. Make sure the balloon is approximately the same size as the child's head so the mask will fit well later.
Stir the paste into a container of water according to the package instructions and stir vigorously until there are no lumps. Let it swell a bit; if necessary, dilute with more water.
Tear newspaper into pieces, brush with paste or dip directly into the paste. Lay them in layers on the balloon until the entire balloon is covered, smoothing the surface with your fingers.
Apply 3–4 layers on top of each other, leaving the knotted end of the balloon free. Then allow the papier-mâché to dry completely.
Decorating the mask – how to:
When the papier-mâché is completely firm (best to wait one day), prick the balloon with a needle and pull it out of the papier-mâché shell through the hole.
Cut the shell lengthwise into two halves with a sharp pair of scissors, starting from the hole at the bottom where the balloon knot was. Now the mask shape is ready. If you like, cut away a smaller portion of the papier-mâché form instead of half, so the mask reaches over the back of the head.
Depending on what kind of mask it should be, cut holes for the eyes and the mouth with scissors.
The outside of the mask is completely painted with a base color. Acrylic paints are best for this, as they are nicely glossy and make the mask's surface even harder. For small children, however, watercolors or tinting paint from the hardware store.
Now the mask is painted individually. Whether it's with a monster mouth, dreamy princess eyes or an pirate eye patch. Colorful yarn strands can be glued on top of the mask as hair.
Hold the mask up to the face and poke small holes in the mask at both edges just above the ears. Thread the elastic band from one hole to the other and knot the fastening – done!
To the latest articles from this topic area

Image credits
Asian girl wearing a hat, sitting at a table and modeling with clay © somchairakin - stock.adobe.com
Child sitting at a table, shaping a clay cup with their fingers © Maria - stock.adobe.com