Tips for Easter crafting with children
Choose Craft projects suitable for the age and abilities of your children.
Avoid too many craft ideas at once, so as not to overwhelm your children.
Decide before crafting, which and how many Easter decorations you want to make.
Include your children in the planning so they are proud of their contribution.
Crafting promotes creativity and fine motor skills of your children.
Children discover their skills and learn playfully about Easter customs.
Have fun and enjoy the time together while crafting to create beautiful Easter decorations to create.
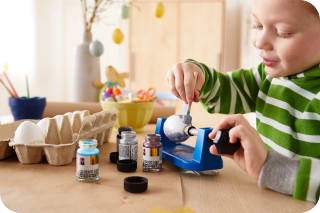
Materials for crafting great Easter decorations
To get started right away and be able to make beautiful Easter decorations, such as Easter bunnies or Easter tree ornaments, you will of course need, in addition to lots of crafting fun, also the right materials and utensils. Therefore we have created a overview created to guide you. Maybe you already have one or the other at home. Because whether Easter nests made from natural materials, paper garlands or felt ornaments: With the right Easter crafts & Easter craft kits you can bring your ideas to life!
Grab your craft supplies and put your ideas into practice right away. Have fun!
paper, cardboard, paperboard
egg cartons
(plastic) eggs & eggshells
paper plates & cups
yarn & feathers
needle & thread
wood
moss
colored construction paper
transparent paper
felt
paper-piercing needles
hot glue gun
craft glue/adhesive
markers & paints
acrylic & watercolor paint
brushes
craft scissors
Easter stamp sets
craft stencils
popular seasonal flowers (also in artificial form)
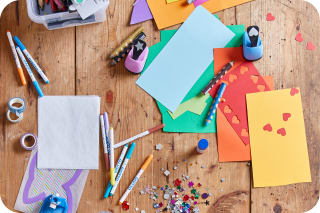
Easter crafts with children: Instructions
If you have all your craft supplies together, you probably want to get started right away, right? So on your marks, get set, go – create the most wonderful Easter decorations and enjoy your shared crafting hours. Whether animal felt crafts, Easter bunnies, Easter garlands and tags, or great Easter nests – we have various ideas and instructions gathered that will inspire you to create your own artworks. There's sure to be something for every taste.
Make wall and table decorations
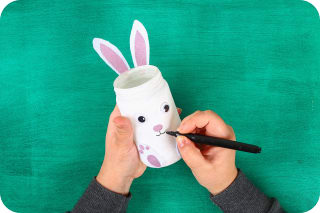
Handmade bunny cups

Materials needed:
Paper cups
colored construction paper
Pens & paints
Craft scissors
Craft glue
Googly eyes
How to:
First decide whether you want to paint various details on your paper cups with colors and pens or prefer to use several layers of construction paper. Tip: If you decide to only paint the details, you can continue directly at step three.
For your bunny-look paper cups that consist of several colors and details, first cut construction paper in your favorite color into strips. You mainly need large strips that match the height and width of your cups so they fully wrap around them. Glue the strips onto your paper cups.
Now for the details: You can attach the eyes, ears and whiskers of your Easter bunnies to your paper cups in various ways. Paint them on or stick them on – that's the question. You can craft bunny ears and whiskers out of paper. To do this, first draw them on the construction paper in the respective colors, then cut them out and glue them onto the bunny cup. Now only the rest of the face is missing.
Paint the face of your bunny cup with pens. You can also glue on googly eyes to make your bunny cup look even funnier.
And your Easter bunny cup is finished.
Make Easter baskets
Materials needed:
colored construction paper
Pens & paints
Craft scissors
Craft glue
How to:
If you've downloaded the craft template, first cut out all parts of your gift bag. With small children, parents should help.
Now take the bag bottom and fold it on both sides along the lines.
Next, cut the folded sides of the bag bottom along the dotted lines.
Then glue the side panels to the bag bottom.
Finally, spread craft glue on the outer ends (highlighted in gray) of the handle to also attach it to the bag bottom.
Fill your gift bag with tasty treats, Easter eggs, or other small gifts and make your loved ones beam with this great idea.
Make an Easter gift box
Would you prefer to make a gift box instead of a gift bag? No problem: simply download the instructions and craft with your children right away!
Make an Easter egg nest
Easter eggs are good as decorations. They can also be packaged as small gifts. Simply download the printable template and place your decorative Easter egg into a beautiful nest.
Make an Easter nest from egg cartons
Or would you rather make an Easter nest yourself from egg cartons make? A sustainable craft project that will bring your kids lots of joy!
Materials needed:
Egg cartons in various sizes
colorful Easter eggs (including plastic eggs)
Moss, cotton wool & straw for the filling
Craft scissors
Craft glue
Pens & paints
Acrylic & watercolor paints
Feathers in various colors
Construction paper in various colors
How to:
First, shape the egg carton in the size of your choice. To do this, cut off the lid. Make sure the sides are even and you don't have any unsightly corners sticking out.
Next, paint the egg carton with your favorite colors. You can paint individual motifs or paint the carton uniformly in one color. That's entirely up to you. Then let it dry well.
Once your Easter egg carton is dry, start filling it. To raise your eggs slightly in the cups, glue a little cotton wool into the hollows. Instead of cotton wool, you can also use moss, which makes your egg carton look even more like an Easter nest. Add a little straw and the natural look is perfect.
Now you just need to place your Easter eggs in the cups and your Easter nest is complete. By the way, you can dye Easter eggs yourself or paint them with great motifs. Both real eggs and plastic eggs can be placed in your Easter nest.
Bunny-style candle jar
Materials needed:
an old jam jar or similar
Acrylic paints
Paper plate
Paintbrushes
Sponges
old newspaper
colored construction paper
Craft glue
Craft scissors
Tea lights
How to:
First prepare your workspace by laying out old newspaper. This ensures that you only paint your cute bunnies and not your furniture with acrylic paint.
In the next step, take a paper plate and place a slightly larger dollop of your desired acrylic paint on it. If you like, you can also mix several colors on the paper plate for your Easter bunny.
Now dip a sponge with the soft side into the color of your choice and apply the paint to the jar. Important: Make sure you apply the paint evenly. You can also first paint one coat and let it dry to see if everything is well covered with paint. If necessary, then apply another coat of paint.
Once your jar is dry, use a brush to paint the details of your Easter bunny: eyes, mouth and nose and all the other nice things you have thought up for your bunny-style candle jar.
You can draw the bunny's ears and little feet on construction paper, cut them out and then attach them to the jar with craft glue.
All that's left is a tea light that you place in your jar. And your glowing bunny-style candle jar is ready.
Decorate Easter branches with paper ornaments
Required materials:
Craft template
Craft scissors
Pens & paints
colored thread
Instructions:
Once you've downloaded the craft template, roughly cut out your motifs.
Then fold the template along the lines so the motifs overlap.
Now cut out the individual motifs precisely. Begin with the ornament you want to make first.
Cut a length of thread and place it in the middle of one of your motifs. Glue the two parts of the motif together.
Now knot the ends of the thread together so a large loop is formed, which you can use to hang your ornament on an Easter branch.
Repeat with the other motifs until you've made all the ornaments.
The ornaments aren't colorful yet. Now change that: paint the ornaments in the colors of your choice. Once you've done that, your decorative paper ornaments for Easter are finished.
First Gluing Easter Eggs
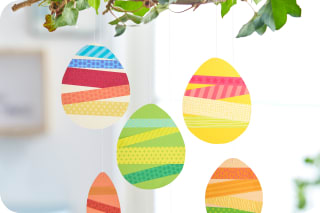
Materials Needed:
Craft scissors
Craft glue
Here's how:
Take the Easter egg cutouts and cover them with fun, colorful strips that you cut out from the template.
Simply cut off any overhanging ends so that the beautiful Easter egg shape is preserved. Tip: You can also decorate the eggs with leftover strips. The crazier your ideas, the prettier your Easter eggs.
Thread some string through the paper eggs and hang the colorful and fun decorations on your Easter tree or branch.
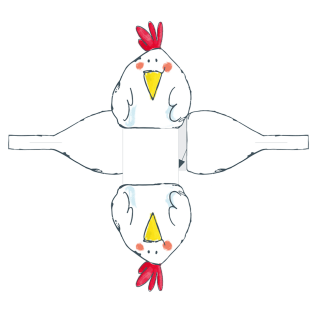
Easter Window Decor
Funny Cut-Out Caterpillars
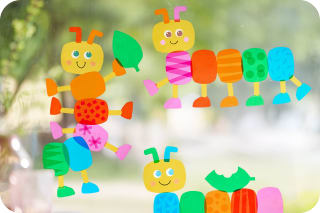
Materials Needed:
Craft scissors
Pen
Here's how:
First, cut out all the pieces of the craft kit.
The craft kit includes a detailed instruction that shows you which individual parts should be glued where.
Now attach your finished caterpillars to your windows – your beautiful Easter decor is ready.
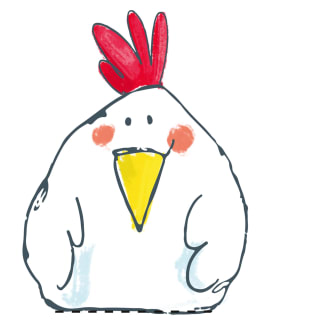
Colorful Easter bunnies
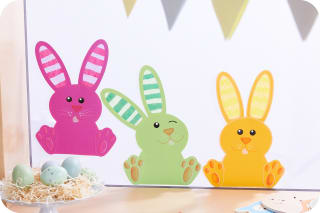
Materials Needed:
Cardstock
Transparent paper
Craft scissors
Craft glue
Washi tapes
Pens
Here's how:
First, create a template for your bunnies. Then cut it out from cardstock.
Cover your cut-out cardstock pieces with transparent paper.
Paint and decorate the bunnies with pens and paints of your choice. You have creative freedom here. Finally, attach the cute Easter bunnies to your windows and enjoy your beautifully decorated window for Easter.
Easter crafts with natural materials
Growing plants in eggshells
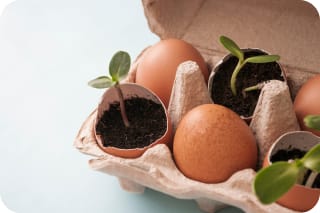
Materials needed:
Eggs
Egg carton
Seeds (garden cress works very well)
Spray bottle with water
small knife
Pin
Soil
Gardening supplies
How to:
If you'd like to make a tasty omelet for breakfast and don't want your eggshells to go straight into the trash, growing plants in eggshells in spring is just the thing for you. For this, take eggshells that you've preferably cracked near the middle and use a knife to remove the inner membrane that may still be left. Tip:Parents should do this step to prevent your children from getting hurt.
Rinse the shells thoroughly afterwards.
Use a pin to poke small holes in the bottoms of your eggshells. The hole should be a bit larger than those you're used to when boiling eggs. This allows water to drain later and prevents waterlogging.
Fill the shells with soil and then sow the seeds on the top layer of soil. Herbs like cress are especially suitable for your DIY planting idea. To give your plants good support and to prevent the eggs from rolling away, place them in an empty egg carton and decorate it if you like. Spray the soil with a little water. Be careful not to drown your seedlings. Water them approximately every one to two days. Tip:Instead of the spray bottle, you can also pour a tablespoon of water over the soil. That amount is completely sufficient to keep the soil moist.
Finally, place your eggshell plants in a sunny spot — for example on your windowsills. After about three weeks you should be able to see and admire the first results. Then it's also time to transplant the plants into proper flowerpots. You can plant them along with the eggshells, because the calcium they contain is good for the soil. Have fun gardening with your children.
Easter nest made from natural materials
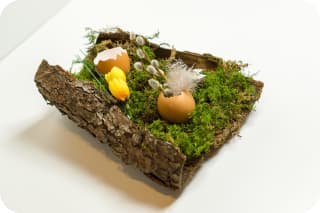
Materials needed:
dried tree bark
moss
eggshells
popular seasonal flowers (also in artificial form)
Feathers and other great decorative materials
Hot glue gun
Craft glue
Craft scissors
Soapy water
Scrubbing brush
How to:
If you found a nice piece of tree bark during your spring walk or while hiking with your children, first clean it with soapy water and a scrubbing brush. Then let the bark dry thoroughly for several days. Once your bark is completely dry, you can move on to filling your Easter nest. Spread moss over the bark and glue it in place in a few spots with the hot glue gun. Important: Parents should do this part to prevent your children from burning themselves on the hot glue gun.
Rinse the eggshells well. Make sure that no excess membrane remains inside. Then dry them and glue them onto your Easter nest. How and where you place them is entirely up to you.
Now it's time to decorate. You can place flowers — either picked and dried by yourselves or artificial — and other great decorative materials, like feathers and beads, on your Easter nest and attach them with hot glue.
And there you have your handmade Easter nest made from natural materials.
Egg cups
Egg cups are quick to make: simply cut a wide strip of construction paper and fold it horizontally once. Make it into a ring slightly smaller than the egg, and glue the ends together. You can now paint the egg cup as you like and decorate it with bunny ears or chicks.
Fingerprint bunnies
With a white sheet of paper and finger paints, little 'craft bunnies' can have lots of fun. How about a funny fingerprint picture? Many small green fingerprints along the bottom edge of the paper create a spring meadow, where yellow fingerprints become cute chicks and colorful prints become Easter eggs or flowers. Simply trace a few outlines and details with colored pencils and the funny Easter decoration is ready. If the children paint on white card stock, they can also make their own Easter cards this way.
Balloon chicks & bunnies
The absolute hit among homemade Easter decorations are balloon chicks and balloon bunnies. For this, inflate balloons a little and tie them off. With a few ears and legs made from construction paper and a cotton ball as a tail, you get a fun, airy bunny. Chicks can be made just as easily with a beak, tail feathers and wings from colorful paper. If desired, you can hang the balloon chicks from strings on lamps or the ceiling and let them flutter around.
More Easter craft ideas for children
Craft funny Easter bunnies
Cute and funny Bunnies are the most popular Easter motifs with children. You can recreate rabbits in a wide variety of colors and shapes. We present ideas and instructions that make it easier for you to recreate them.
Decorate colorful Easter eggs yourself
What would Easter be without colorful Easter eggs? The egg hunt would only be half as much fun if you hadn't worked together in craft sessions to make them shine in the brightest colors. The best part: Easter eggs can also be dyed naturally, so you can safely eat them even after dyeing. How best to proceed when dyeing eggs and which foods provide which colors, you can find out here.
Craft great Easter cards
Of course, your Easter gifts also include the matching Easter cardsMore Easter craft ideas for children
Frequently asked questions about making Easter decorations with children
When should we start making Easter decorations?
Which natural materials are particularly well suited for Easter crafting?
At what age can children mostly make Easter decorations themselves?
What do children learn when crafting for Easter?
Why is crafting so popular at Easter?
More Easter inspiration in our magazine

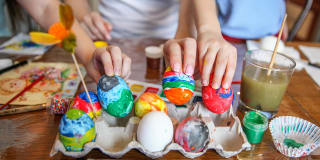
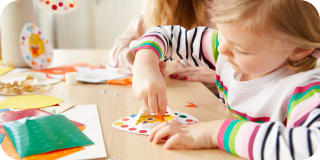
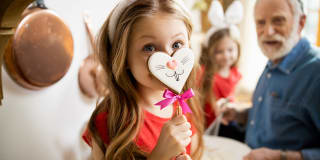
Image credits
Bunny cup made of cardboard © Steffen - stock.adobe.com
Homemade Easter bunny in a glass vase, felt and googly eyes on a green background © detry26 - stock.adobe.com
Fresh sprouts, seedlings in eggshells © Nina Hlupich - stock.adobe.com
Easter decoration tree bark and eggshells © Sharidan - stock.adobe.com