Craft ideas: These lanterns you can make with your children
Making lanterns is a great way to to actively promote your little ones' creativity. For although the choice of motif may not seem very large, it nevertheless gives you plenty of freedom to develop your artistic talent and enjoy shared Crafting sessions with your children to enjoy.
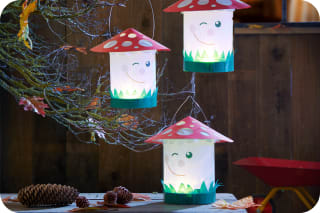
The motifs and shapes of lanterns couldn't be more varied: Whether classic round or square Martin lanterns with houses, moon and stars or your children's favorite animals – when designing lanterns there are no limits. Especially popular with kids are hedgehog lanterns suitable for autumn or imaginative motifs like the moon lantern, which makes them ponder what might be happening up there in the universe.
Generally, when crafting lanterns together with your children, you should make sure that you choose theideas and instructions according to your children's age, interests and developed abilities choose. Therefore always involve them when searching for suitable crafting ideas. Children also usually brim with ideas. That way you'll definitely find something. \n\nWhen crafting lanterns, in general even toddlers to participate. It's only important to clarify who takes which part. Usually the crafting process of Martin lanterns consists only of shaping the frame and the colorful details that are later supposed to be brought out by a glow stick. While the former often requires help from you as parents, the latter can often be carried out independently by toddlers already.
Lanterns: These types of constructions exist
As a rule, the sides of lanterns for Saint Martin are held together bya moldable frame made of cardboard held together, which can be designed in many ways. The more detailed you want the structure to be, the trickier it becomes – that's exactly right for you if yoularger craft projects want to take on.
Depending on the difficulty level of your lanterns, there are small aids that make crafting easier for you. For example, there are already lantern blanks to buy, which spare you the work of creating your own stable support for your Martin lantern. Classic lanterns in cuboid or cylindrical form are particularly easy to make yourselves. With templates, craft kits, and stencils, you can even tackle more detailed motifs.
One thing is certain: start small and work your way up each time. That way even craft instructions that initially seem complicated will succeed in no time.
Why is making lanterns so special?
Children love being allowed to let their creativity run wild and marvel at their own little fingers that conjure up the beautiful works of art. With their self-made lanterns, your protégés will march especially proudly through the streets. This makes learning about traditions even more fun. In general, this helps Autumn crafts and in particular the making of Martin lanterns gives your kids more understanding of certain traditions and customs to gain.
When making lanterns, they therefore already learn their first important information about the honoring of Saint Martin, the patron saint of beggars and soldiers, which takes place on Martin's night on November 11 and is carried out here as a lantern procession. Last but not least, this also anticipation for the Martin procession is increased.
Crafting together with children is not only beneficial for acquiring knowledge, but also the mental and physical development of the little artists is thus promoted. It helps them practice patience and approach tasks more focused. Over time you can sit with craft projects for longer and also increase the difficulty levels of lanterns. In addition, creativity and fine motor skills of your little crafters are improved.
But one thing is of far greater importance: crafting creates a lovely family experience. Together you use yourfamily time and thus strengthen thefamily cohesion. What could be cozier than sitting together on, for example, a rainy day with a delicious cup of tea and cookies and creating beautiful works of art?
Materials you need for crafting lanterns
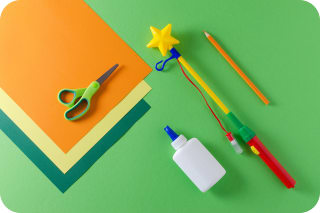
The most important crafting materials for lanterns are transparent paper in various colors as well as colored cardstock, corrugated paper, or old food boxes that would otherwise be discarded. But besides the obviously needed materials there are many morecraft supplies you can use for your creative sessionsWhich ones are they?
HABA has compiled for you herean overview of all the required crafting materialscollected. You probably already have some of these at home so you can start crafting right away. So what are you waiting for? Check that you have everything you need and get creative. Have fun!
Corrugated cardboard
Crepe paper or glitter paper
colored cardstock
colored tissue paper
Felt
Craft glue or paste
Paintbrushes
Compass
Ruler
Pencil & eraser
Craft scissors or utility knife
Pens & paints
Acrylic & watercolor paints
Finger paints
Newspaper or craft mats
Needle & thread, shape punch
Googly eyes
Lantern stick (with handle)
Lantern blanks
Wire
Seasonal leaves and flowers
PET bottles, round cheese containers, or Tetra Pak cartons
Making lanterns with candles or LEDs: Which is more suitable for children?
When it comes to whether one should traditionally choose a candle or an LED lamp to light the lantern, opinions are divided. Both have advantages and disadvantages that need to be weighed. Many swear by classic candlelight — partly for reasons of tradition, and partly because it gives a nicer and warmer light.
Weigh aesthetics and practicality against each other. An LED lantern stick or an LED tealight is definitely the safer option. That way you avoid unforeseen accidents and tears because the lantern caught fire.
With LED lantern sticks, your children can move freely and parade down the street singing without having to constantly look after their lanterns. If the LED light is too cold for you, you can compensate by using translucent paper in warm red, orange, or yellow tones — this way the lantern shines in warm autumn hues, just like with real candlelight.
Exciting ideas & craft instructions for impressive lanterns
You want to get started making your lanterns right away but don't yet know what to use and how best to begin? No problem, HABA has put together here the most beautiful craft ideas and instructions collected, just waiting to be recreated by you.
The best part: The craft instructions are suitable for children of all ages. With a little parental support, even toddlers can pitch in while crafting to help out energetically with lanterns.
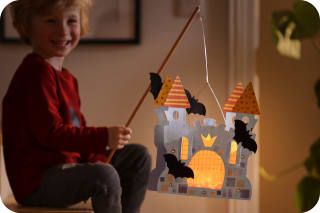
The classic St. Martin's lantern
Materials needed:
round cheese boxes in the diameter of your choice
Scissors &/or utility knife
Glue
colored translucent paper
colored construction paper
colored pencils
pencil & eraser
finger paints
wire
lantern stick
Instructions:
For the base and top of your lantern, it's best to use round cheese boxes that you would otherwise probably have thrown away. For the bottom, use a closed round cheese box in the diameter of your choice (you can already remove the lid). For the top, take a round cheese box in the same desired size and carefully remove its bottom with scissors or a utility knife.
While you parents take care of preparing lids and bottoms, your children can already start designing the translucent paper. However, before crafting, make sure that the size of the translucent paper corresponds to the circumference of the cheese boxes. In this step there are no limits to imagination! From finger paints and colored pencils to glitter paper and colored cardboard, everything can be used to decorate the lantern walls with favorite motifs or simply create a wild colorful world. Tip: Instead of just painting the translucent paper, you can also use colored construction paper, on which you paint various motifs, cut them out with a utility knife, and then cover them with colored translucent paper. That way only the punched-out motifs will be illuminated later.
If your children have extensively decorated the translucent paper, it's now time to glue together all the parts of your lantern. To do this, first spread glue along the side edges of the translucent paper. Next, roll the paper in so that the glued side edges can stick to the inner rim of the bottom of the cheese box. Press the translucent paper firmly onto the bottom.
Once the lower part is attached, it's the upper part's turn. For this, take the box whose bottom you removed in step one. Here too, press the glue-coated side edges to the inner rim of the box.
When everything is dry, glue the two remaining side edges of the translucent paper together so that the lantern is completely closed all around.
Finally all that's missing is the lantern handle. You can easily bend that yourself from a wire. To attach the handle to the lantern, make two holes at the same height parallel to each other in the cardboard of the cheese box with the scissors. Then attach the lantern handle there.
All that's left is the lighting. Either use an LED tealight that you place inside the lantern, or an LED light stick whose hook you can attach to the wire.
And your classic St. Martin's lantern is finished.
Make a cute hedgehog lantern
Materials needed:
brown cardstock
colored construction paper
translucent paper
Scissors &/or utility knife
Glue
markers
pencil & eraser
optional hedgehog template
wire
lantern stick
Instructions:
First, draw the body of a hedgehog twice on brown cardstock. If you don't feel confident drawing the body freehand, you can download a template from the internet and print it or trace it from a craft book. Then cut out the two hedgehogs.
Now it's time to prepare the lantern base. For this, draw a wide long strip on the cardstock so that it matches the width of the hedgehog and can later be attached to it. Add another one to two centimeters to the long sides of the strip. Only then cut out the strip.
Then cut the one-to-two-centimeter edge into centimeter-wide slits. This creates the glue tabs of the lantern.
Now you can design your hedgehog as you wish. Paint the nose, eyes, mouth and hedgehog spines on, or draw the details on construction paper in the appropriate colors, cut them out and glue them onto the hedgehog.
To make the hedgehog lantern glow, part of the lantern walls (usually in the middle and up to the height of the hedgehog's spines) is cut out with scissors or a utility knife. The resulting windows are backed with yellow or orange translucent paper (of course you can use other colors).
Now connect both lantern walls together. For this, take the strip you prepared earlier. Fold the glue tabs over and spread enough glue on them.
Now glue the strip, i.e. the base of the lantern, firmly to the hedgehog's lantern walls. The glue tabs should be pressed firmly against the inner walls.
Finally, form a handle from wire. Make small holes with the scissors at the outer edges on the top of the hedgehog lantern and attach the wire there.
With a light stick whose hook you only need to attach to the wire, your hedgehog will shine in wonderful colors.
And your hedgehog-shaped lantern is finished.
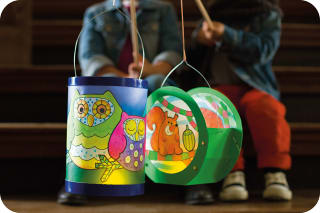
Make a fun owl lantern
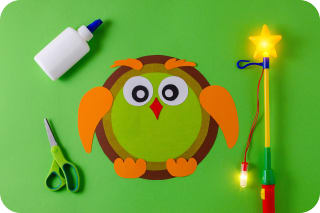
Materials needed:
pencil & eraser
Scissors &/or utility knife
craft glue
markers & paints
translucent paper in yellow & orange
cardstock in various shades of brown, orange, black & white
optional owl template
wire
lantern stick
Instructions:
So that you can view the owl lantern from both sides later, you need all details twice. Accordingly, make two owls.
First sketch the owl body on brown cardstock and then cut it out. If you don't want to draw it freehand, you can also download a template and print it to trace and then cut out.
For the lantern base, make a long and wide strip from the brown cardstock that roughly corresponds to the overall size of your owl. Add about one to two centimeters to the width to allow for cutting and to create glue tabs.
To allow the inside of the owl body to be nicely lit later, cut out a large circle there.
Now you can prepare the translucent paper. It should be cut to about the right size so that it can be glued to the back of the owl body.
Attach the translucent paper to the owl body and let it dry well. In the meantime, work on the details of your owl lantern. Draw wings, beak, eyebrows and little feet on orange construction paper, cut everything out and glue them to the appropriate places on your owl.
You can also draw the eyes on black and white construction paper, cut them out and then attach them to your owl.
Once you have made both owls that make up the lantern walls, the lantern just needs to be glued together.
Take the lantern base and spread enough craft glue on the glue tabs. Then attach them to the backs of your owl bodies (i.e. the inside of the lantern). Press everything firmly together.
Now all that's missing is the handle, which you can form from wire. On the sides of your lantern, make two holes with a needle, through which you attach the wire.
Finally, hang your owls on the lantern stick and switch on the light.
And your owl lantern is finished.
Make a lantern from paper plates
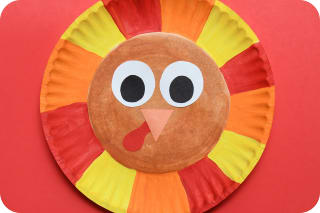
Materials needed:
two paper plates
felt-tip pens
acrylic & watercolor paints
brushes
scissors
string
craft glue
colored construction paper
colored translucent paper
light stick
Instructions:
First paint your two paper plates in the colors and motifs of your choice. For a rooster, for example, you can paint the inner circle of the paper plate brown and alternate the outer part in red, yellow and orange.
Now cut out the plate base of each paper plate.
You can use the plate bases as templates for your colored translucent paper. Place them on the paper and draw around them with a distance of about one centimeter. Then cut out the shape you drew.
Now glue the translucent paper to the insides of the paper plates.
If you choose animal motifs, the face of the respective little animal should of course not be missing. Paint eyes, nose and mouth as well as other details onto the translucent paper with pens. Alternatively, certain details can also be drawn on colored translucent or construction paper, cut out and glued on.
For the lantern handle, poke two holes through the back at the top of the lantern walls with scissors. Thread a piece of string through and knot it at the back. You can now glue the paper plates together at the sides. The top remains slightly open, after all the light stick still has to go in there.
Make a lantern from papier-mâché
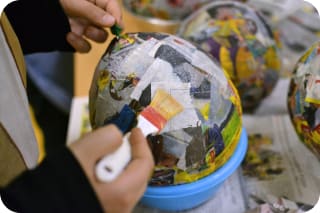
Materials needed:
balloons
colored translucent paper
paste
brushes
needle
old newspaper
glass
scissors
wire
light stick
Instructions:
First blow up a balloon and place it on a glass. Then prepare the paste. For this, take two tablespoons of paste and mix it with 200 milliliters of water into a pasty mass.
Now it's the children's turn. Let them tear the colored translucent paper into small scraps to their heart's content. This is great fun especially for toddlers.
Next apply the paste generously—but not too thick a layer—to the balloon. It's best to work in stages, because otherwise your paste will dry again before you've glued the scraps on. There are no rules when gluing on the pieces.
Whether glued on randomly or with the intention of creating a motif from the scraps—let your creativity run free when covering the balloon.
Once you have attached all your scraps, wait about 2 to 3 days until the balloon is completely dry.
When your papier-mâché is firm and dry, pop the balloon with a needle and remove the remains from the papier-mâché. Cut the top edge into a nice round shape without leaving corners or edges.
For the handle, which you can form yourself from wire, make small holes at the outer edges of the lantern with the help of the needle. This allows you to easily attach the wire there.
All that's left is the light stick and your homemade papier-mâché lantern is finished.
More autumn crafts for young and old
If your little budding artists have caught the crafting bug, there are, in addition to making lanterns, many other ways to express themselves creatively. Autumn offers numerous natural materials that you can collect on your walks and use in your craft sessions.
The choice of motifs also seems completely unlimited, so you can let your creativity run free. What lovely things can you make? HABA has colorful ideas and craft instructions for all age groups on the relevant topic pages – you'll definitely find something.
Make your own kite
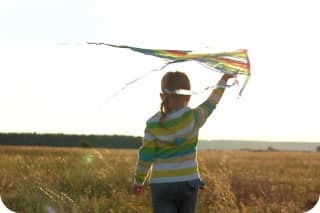
In autumn the perfect (weather) conditions for kite flying prevail. To the delight of your kids, you can also easily make your own. That makes flying a homemade kite even more fun than it already is.
Crafting with acorns
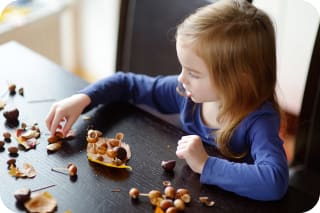
In autumn you'll find an incredible number of acorns in nature. They're ideal for creating wonderful works of art and decorations that are sure to impress. As gifts or to beautify your home – Crafting with acorns is fun in every way.
What creations can you tackle with acorns? HABA shows you and offers many various project ideas ready for you, just waiting to be made by you.
Crafting with pine cones
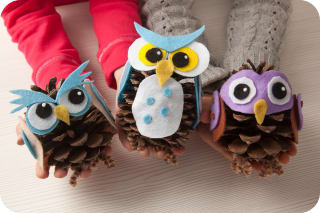
Autumn reveals the greatest finds. Thus you will find pine cones in a wide variety of shapes and colors along the wayside. From these natural materials you can create the most imaginative works of art — and they're also great as decorations.
On HABA's relevant topic page you'll find fun craft ideas and DIY instructions, which are suitable for children of all ages.
Crafting with leaves
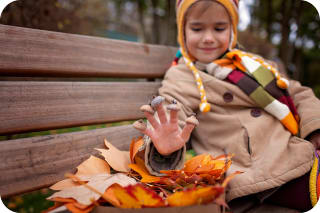
When leaves turn colorful and fall from the trees, autumn has arrived. You can also enjoy autumn leaves in your craft sessions and create great decorations.Whether an autumn wreath, a lantern, or a leaf album — there are numerous project ideas.
What decorative pieces can you create? HABA shows you on the relevant topic page popular designs and craft instructions to recreate.
Frequently asked questions about making lanterns with children
At what age can children make lanterns?
What requirements should a handmade lantern meet?
Why are lanterns crafted with children in daycare centers and schools?
To the latest articles from this topic area


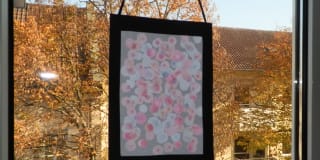

Image credits:
Craft materials for lantern: colored cardstock in yellow, orange, green with scissors, glue, pencil and LED lantern stick © nadisja - stock.adobe.com
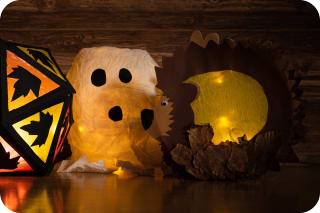
St. Martin lanterns in hedgehog shape, ghost shape and leaf motif © mpix-foto - stock.adobe.com
Owl motif made from colored cardstock with glue, scissors and LED lantern stick © nadisja - stock.adobe.com
Paper plate painted as a bird, with red, orange and yellow rim, lantern motif © Deanna - stock.adobe.com
Balloon is covered with papier-mâché for a lantern © Ina - stock.adobe.com
Girl crafting with acorns © MNStudio - stock.adobe.com
homemade owls© ISO101 - stock.adobe.com