Carving pumpkins at Halloween – the background of the custom
Halloween has long since arrived in Germany – to the delight of all children. On this day little ghosts, creepy witches or scary vampires roam the streets to go on a trick-or-treating to go. But why do we celebrate Halloween at all and what's the story behind the costumes and pumpkin faces?
The origin of the Halloween festival goes back to the Celts back. They settled Ireland, Scotland and northern France over 5,000 years ago. According to Celtic belief, on October 31 each year the realm of the living mixes with that of the dead. To protect themselves from evil spirits, people dressed up on that day and also sacrificed fruits such as pumpkins.
Useful crafting tools
You don't need much equipment to carve a pumpkin – with the right crafting tools you can hollow out a pumpkin and give it a spooky face in no time. At HABA you'll find the appropriate tools to get started right away.
Inspired by the Celts' superstition and their former offerings, today's popular pumpkin lantern (in American Jack O'Lantern) came into being. It adorns house entrances and windowsills as a spooky decoration during the autumn months. Especially for children, it's great fun to carve a spooky face out of a pumpkin themselves. And it's not that difficult – we'll show you how to easily transform your own pumpkin into a suitable Halloween decoration.
These pumpkin varieties are suitable for carving

If you want to carve a scary or funny face from a pumpkin, you should consider when choosing the pumpkin variety whether it is edible or not. Not all pumpkins are suitable for consumption.
The classic Halloween pumpkin is large, orange and has a round shape. Its flesh tastes sweet and mild and is ideal for soups or desserts. The skin of this variety is not very hard and therefore ideal for carving a pumpkin face with your children.
With the butternut squash is a light-colored, pear-shaped squash. Its flesh tastes sweet and nutty – perfect for desserts or hearty dishes. Because of its smooth skin it is easy to work with and even children can carve a scary face with little strength. The very little ones can help hollow it out with a spoon.
Among the most popular and edible pumpkin varieties include:
classic Halloween pumpkin
Hokkaido
butternut squash
muscat squash
Another of the most popular varieties is the Hokkaido pumpkin. You can find this in autumn in most supermarkets. Its taste is savory and slightly tart, which makes it ideal for savory dishes. Even the skin is edible. The Hokkaido is, however, a bit harder, so carving requires a little more effort. Special caution is required when carving.
Muscat squashes are, just like Halloween pumpkins, very large. Unlike their orange relatives, the skin of this variety is dark green to light brown. The fruity-tart flesh is even edible raw and is suitable for desserts but also for various other dishes.
Materials needed for pumpkin carving
You and your children are probably already itching to get started and would like to begin carving your own pumpkin right away. To make sure you're perfectly prepared for the craft fun, we'll now show you which materials should not be missing for Halloween crafting.
Materials at a glance:
small sharp knife, utility knife or craft saw
felt-tip pens for tracing the shapes
spoon for hollowing out
bowl for collecting the flesh
tea light or candle
surface for carving (e.g. towel or small board)
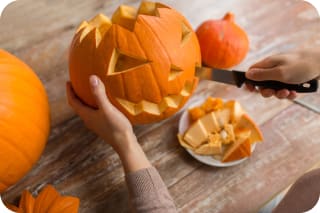
Instructions: How to carve a spooky pumpkin for Halloween
Step 1 - Preparation
First, it's best to lay out your required craft supplies. Place a towel or a small board under your workspace – this gives you a flat and protected work surface, which makes carving your pumpkin easier and ensures that the floor and table stay clean.
Step 2 - Remove the pumpkin lid
Now let's get started: Take a knife and cut a lid out of the top around the stem. This can be round or jagged. Our tip: draw your desired shape with a felt-tip pen and follow it with the knife. Be especially careful when cutting and make sure the lid does not fall into the pumpkin.
Step 3 - Scoop out the flesh
Now it's time to hollow it out. It's important that you remove all seeds, the flesh and the fibers – you can best do this with a spoon. Be extremely careful at this step, because the less material you leave inside, the longer your Halloween lantern will last.
Step 4 - Sketch the face
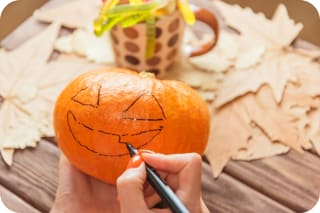
Now comes the most exciting task – you get to give your pumpkin its face. Whether your friend has a funny grin, a scary grimace or a mysterious other facial expression has, is up to your taste. Be creative and sketch the mouth, eyes and nose with a felt-tip pen. It's best to use a water-soluble pen so you can wipe the face off and redraw it if you're not satisfied yet. It becomes even easier if you first draw a template and cut it out to transfer the outlines onto the skin.
Step 5 - Carve out the contours with the knife
If you like your pumpkin, work with a knife or a small craft saw to carve out the contours. Try to score the skin along the pre-drawn lines. If your children are already old enough to carve themselves, they may still need help at first. Make sure that especially younger children never work unattended. When your pumpkin looks at you with its cheeky or friendly face, you'll have almost finished.
Step 6 - Preserve the pumpkin
Since your pumpkin is made of natural materials, it won't last forever of course. But you can already make sure while carving that the longevity is increased a bit. As you already learned in step 3, it's best to remove as much material as possible from the inside to slow mold growth. Apply from the outside a special anti-mold spray from the drugstore. This seals the surface and kills bacteria. Ideally, you should spray your pumpkin daily inside and out with the spray – so you'll enjoy your artwork for a long time.
Step 7 - Final steps
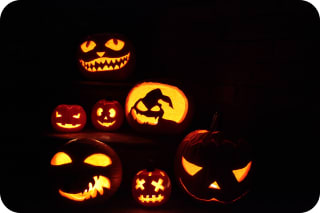
To make your pumpkin lantern shine in the dark, place a tea light or a candle in the middle. Put the lid back on and choose a nice spot for your Halloween decoration. Now you only have to wait for dusk to set in – light the candle and enjoy your self-carved pumpkin.
Recipe ideas: Tips for using the pumpkin flesh
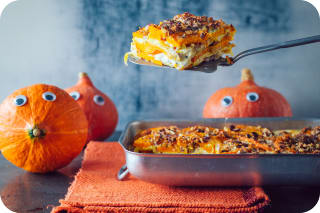
From carving your pumpkins you probably have a lot of flesh left now. It would be a shame to just throw it away. If your chosen pumpkin variety is edible, take the opportunity to cook delicious pumpkin dishes to cook. As inspiration, we'll now show you 2 simple and tasty recipes that you can cook together with your children can.
Sweet pumpkin soup
Ingredients:
500 g pumpkin
1 liter water
100 g sugar
1 tbsp semolina
3 tbsp lemon juice
1 pinch cinnamon
3 cloves
Remove the flesh from all the seeds. Save them – roasted pumpkin seeds taste great as a topping for the soup. Put the flesh in a pot with 750 ml of water and add the cloves and cinnamon. Let it cook for about 20 minutes, until the pumpkin is soft.
Stir the semolina into the remaining cold water and let it swell a little. Now add this to the pot with the other ingredients. Bring the soup to a boil again and puree everything with an immersion blender. Now you only have to stir in the lemon juice and sugar and season the soup to taste. Enjoy your meal!
Orange-lemon pumpkin cake
Ingredients:
600 g pumpkin
500 g flour
400 g sugar
250 g soft butter
6 eggs
1 packet baking powder
1 packet vanilla sugar
2 oranges
3 lemons
Put the flesh without seeds into a pot with 100 ml of water. Let it simmer covered for about 10 minutes. When the mixture is soft, puree the flesh with an immersion blender until you have a puree.
Take about 400 ml of the puree and put it into a greased and floured Bundt pan. Now preheat the oven to about 150 degrees C (fan) or gas mark 2.
Put butter, 250 g sugar, vanilla sugar and 1 pinch of salt into a mixing bowl and beat the batter with a hand mixer for about 3–4 minutes until creamy.
Fold in the eggs, flour and baking powder gradually. Pour the finished batter into the baking pan and bake in the oven for about 60 minutes.
After baking, test with a wooden skewer if the cake is firm inside. Then take the cake out of the oven and let it cool in the pan for about 20 minutes.
In the meantime, squeeze the oranges and lemons so that you get 300 ml of juice. Boil the juice with the remaining 150 g sugar in a pot for about 10 minutes and let the syrup cool briefly.
Carefully remove the cake from the pan, but leave it in the pan for filling with the orange-lemon syrup. Pierce several holes in the bottom with a wooden skewer and drizzle the entire cake with your prepared syrup. Be patient until everything has cooled well – your fruity-sweet pumpkin cake is ready.
Frequently asked questions about carving pumpkins
How long does a carved pumpkin last?
Where can I buy a pumpkin to carve?
When can my child carve a pumpkin on their own?


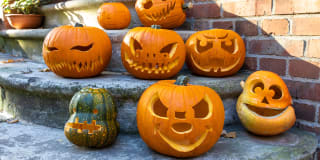


Image credits:
Mother and daughter gaze in amazement at a carved pumpkin with pink smoke rising from it © Viktoriia - stock.adobe.com
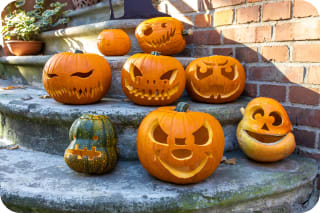
Carved pumpkins on a staircase © Stefan Werner - stock.adobe.com
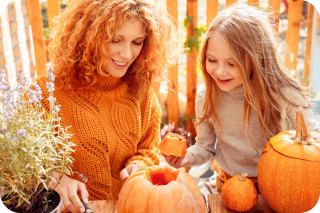
Girl looking at a pumpkin in her hand © Viktoriia - stock.adobe.com
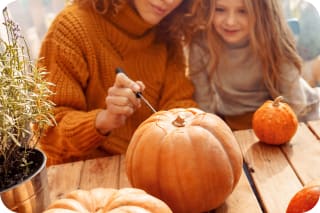
Mother and daughter carve a pumpkin © Viktoriia - stock.adobe.com
Mother and daughter remove the pumpkin lid © Viktoriia - stock.adobe.com
Face outlined on a pumpkin © Viktoriia - stock.adobe.com
Pumpkin being carved © Syda Productions- stock.adobe.com
Pumpkins with tealights glowing in the dark © Syda Productions- stock.adobe.com
Pumpkin casserole © JackStock - stock.adobe.com