Candle pouring - for those in a hurry - simple, yet always different
When pouring candles, children can let their imagination run free - provided an adult is present to help with the hot wax. Depending on the mold, different candle shapes are created; with the appropriate dye wax you can make colorful or even patterned candles.
You will need:
Tall, heat-resistant containers to melt the wax in
A large (old) pot to use as a water bath
Molds (available ready-made, but also suitable are
plastic cups, paper cups or straight-sided jars)
Candle wick (from the craft store)
Wax leftovers, beeswax or wax pellets from the
craft store, optionally dye wax
Skewers or strips of cardboard to hold the wick in the
mold in position
Tip: If you melt down old candle stubs, you can pour the liquid wax through a coarse mesh sieve before pouring to remove soot and old wicks.
How to:
Place the container(s) with the wax in the hot water bath. The water should not boil. Stir occasionally until the wax has melted.
Prepare the molds: Cut the wick into sufficiently long pieces and tie the end to a skewer laid across the rim of the mold. This keeps the wick centered.
Pour the liquid wax into the molds. For multiple color layers, each lower layer must have solidified before you can pour a new one.
When the wax is completely hard, briefly dip the mold into the hot water bath to release the candle from the mold.
Candle dipping - for the patient - simple and creative

Admittedly, dipping candles yourself requires some patience. It's not really difficult and the result is worth it. Especially for younger children who, for example Christmas gifts want to make Christmas gifts for friends and family themselves, hand-dipped candles are a good idea. True pros even dip several candles at once.
You will need:
tall, heat-resistant vessels to melt the wax in (e.g. empty sausage tins or old mixing cups)
A large (old) pot to use as a water bath
Candle wick (available at craft stores)
Wax leftovers, beeswax or wax pellets from the
Craft store, preferably in various colors
Optionally a ring or a wooden rod to tie the wicks to so you can dip several candles at once
How to:
Place the wax vessels in a hot water bath to melt the wax. With purchased colored wax pellets you can color the wax differently in the various containers.
Cut the candle wick into at least 30 cm long pieces (at least 60 cm for double candles), if necessary tie to a rod or a ring.
If you want to dip several candles at once, arrange the wax containers side by side so you can dip the wicks into the wax simultaneously.
When the wax in the containers has completely melted (stirring occasionally), dip the wick into the wax, pull it out and pull it taut at both ends once. As the wax dries, the wick will remain straight.
Repeatedly dip the candle wick into the wax and allow the wax to harden each time until the candle is thick enough.
Trim the bottom end of the candle smoothly with a sharp knife or smooth it with a heated metal spatula.
Tip:If during the final dipping operations you dip the candle to different heights into the variously colored wax, stripes will form on the candle.
Have fun: quickly and creatively make your own candles
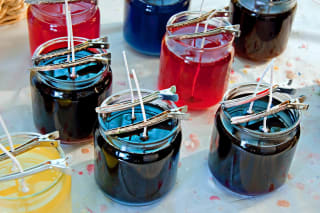
Homemade candles don't always have to be dipped or poured: simple white household candles in various thicknesses and sizes can be imaginatively decorated with liquid wax in different colors.
A few tips:
Wrapping pattern: Wrap the white candles with a sturdy string or a thin wire, either neatly symmetrical or completely irregular. Dip the candle two or three times in the liquid wax and remove the wrapping once the wax has solidified.
Striped pattern: Dip the candle completely into colored wax and let the wax layer harden. Next, dip the candle two-thirds into another color, then dip the last third into another color.
To the latest articles from this topic area
Image credits:
Materials needed for candle dipping. © Catherine Murray - stock.adobe.com
Colorful candles are dipped in jars. © Valerie Garner - stock.adobe.com